Wednesday, December 14, 2016
Blog Post Week 11
Its close to the end of the semester so we are trying to wrap everything up. This week we just nanodropped our samples and took a trip down to the ASU Tempe DNA Sequencing Lab. ( Lots of walking and trying not to get lost). We hope that next semester we will get our sequencing results and confirm the samples we found as positives.
Thursday, December 1, 2016
Blog Post Week 10
I was not able to make it to the lab earlier this week so I do not have much to say. There is no update on the microplastics, there is no money to buy new equipment to try to make this project work. For Pseudomonas the plan is to make gels today (December 1, 2016) to use for tomorrows group meeting. We need a total of 8 gels since we are screening multiple samples. we started to make gels the day before to make it a little easier for the team, there are days were we have to screen many samples and it takes a long time to set the gels and actually run them and not everyone can stay to the end.
Blog Post Week 9
It
was a slow week in the lab. For microplastics there is nothing I can really do
at this point. I spent this week trying to catch up on all the work that I need
for Stem and my classes; I am currently really behind in almost all of my
classes. For the Pseudomonas project we ran PCR on the samples that were
collected from the microbiology classes, something happened to the thermocycler
where our samples were not held at the right temperature so we have to redo PCR
on some of the samples. Since the campus was closed on Thursday and Friday we
did not have our regular Friday meeting. The plan is to screen the samples
through gel electrophoresis next week.
Monday, November 21, 2016
Blog Post Week 8
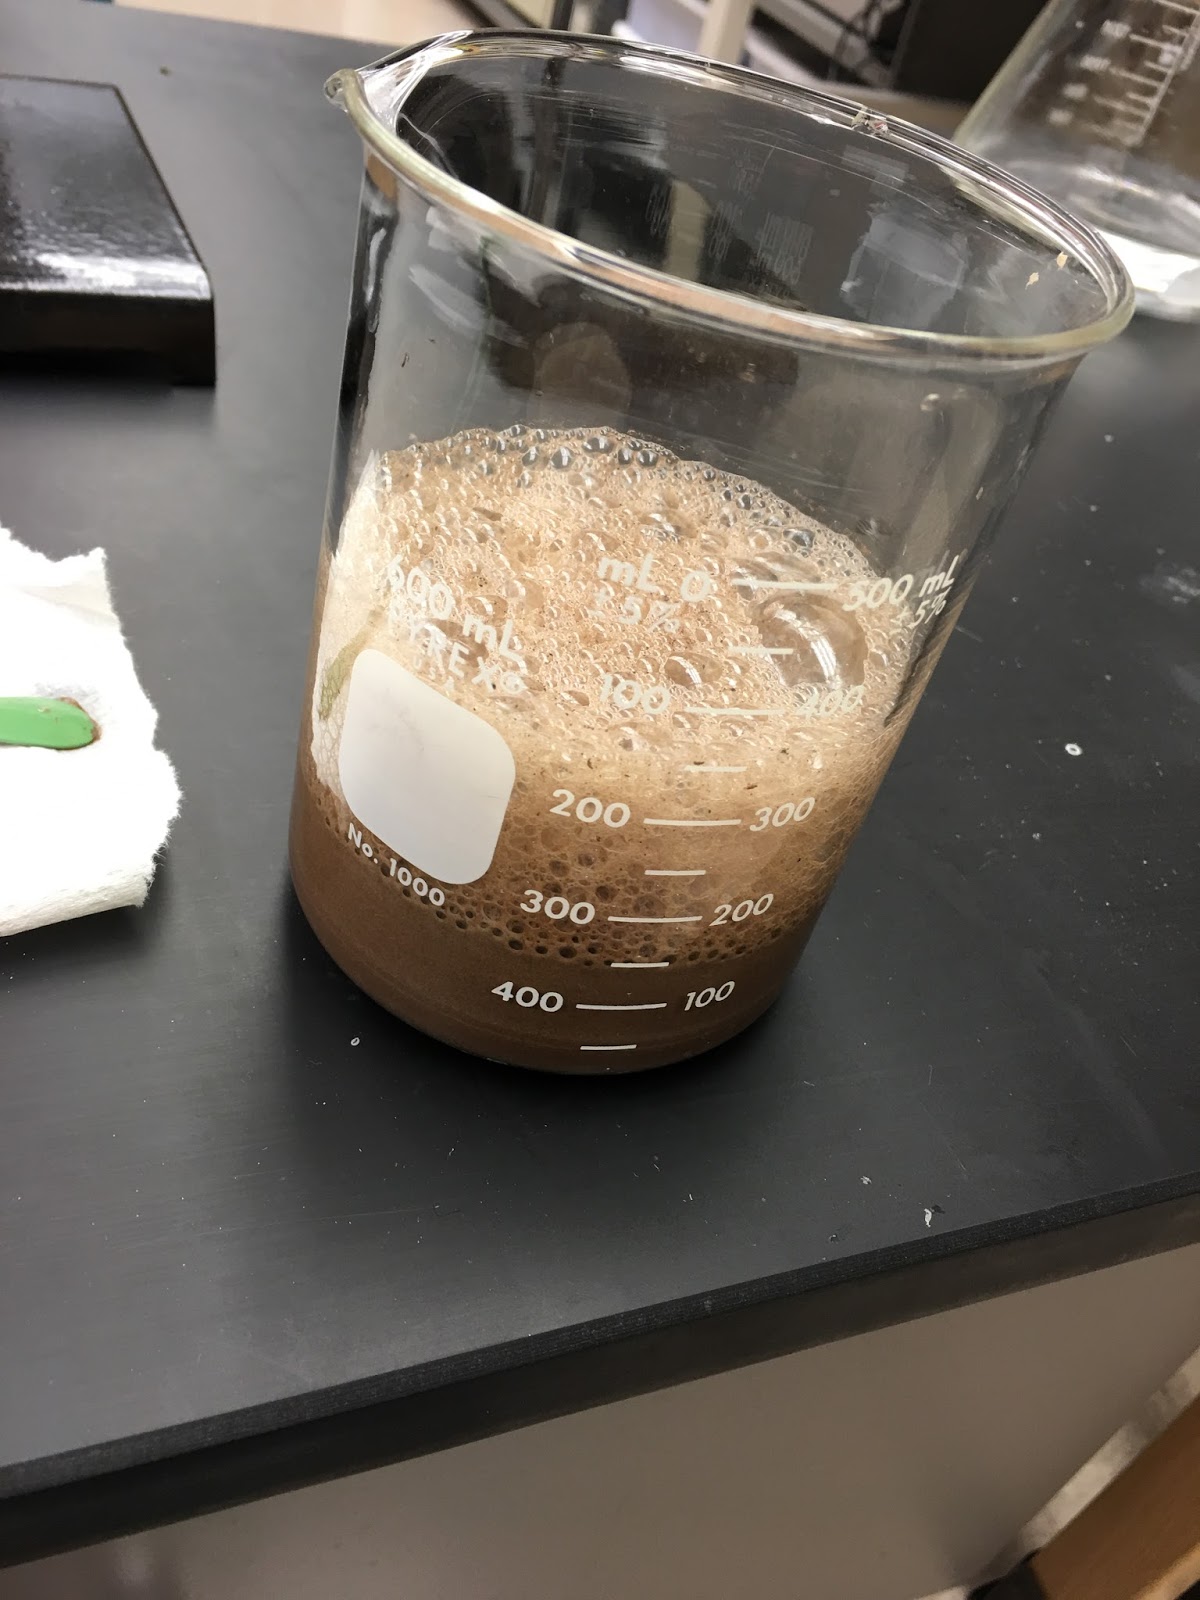
For microplastics this week I tried the beaker method separation
(figure 1) since I finally had shaved down enough plastic to attempt it. I was
supposed to filter my sample once I was finished separating to see what percent
of microplastic we could get back but the microbiology lab needed all the
filtering equipment for the class. So I decided to leave the sample sitting and
filter another day. When I came back to the lab to filter Matt had made a
discovery! The sample had sat for two days. Our though was that all the
plastics would float because they had a lower density than the 5M NaCl
solution, but this did not happen (figure 2). Instead some of the plastics sank
to the bottom. We know that the filed plastic is a microplastic so we had to
find a solution with a higher density. This means that we have to find a cost
effective solution. Matt suggested we attempt to make a 5M NaCl and 10% sucrose
solution. This still did not have a high enough density, the highest density
that we had was 1.301 but it was with a 5M NaCl and 60% sucrose solution (figure 3), which
is not the best. We are once again stuck until we can find a good funnel to
allow to do the separation and a solution with a greater density.
 |
| Figure 1. Beaker method Seperation |
 |
| Figure 2. Sample that was left out Microplastic settled |
 |
| Figure 3. Attempt to make solution with greater density |
Pseudomonas Update: The microbiology labs did DNA extraction of their samples and we were in charge of nanodropping. The microbiology classes also ran a PCR and we were in charge of nanodropping that as well and screening them through gel electrophoresis.
Monday, November 14, 2016
Blog Post Week 7
This was a slow week in lab. I am behind on my background
and method so I spent my time trying to catch up. I have also spent time filing
down plastic. It takes me a long time to file down one gram of plastic to
attempt the beaker method. Matt would like me to try the beaker method at the least
five times. I have only down it once since I have been trying to file down as
much plastic as possible.


Pseudomonas Update: The microbiology classes have started
collecting water and biofilms sample. Our team is now in charge of using the
class samples and taking the date. This week we took pictures of the plates and
transferred some sample onto broth. We also began to organize a file that will
include the classes data.
Thursday, November 3, 2016
Blog Post Week 6
 |
| Figure 1. Beaker Method |
 |
| Figure 2. Unsuccessful Turkey Baster |
We are still trying to find new a good protocol to follow
for the microplastics. Since we could not get a funnel or any separation
apparatus to work Matt suggested we tried the beaker method once more. This
time the beaker method would be different in a way. Matt wanted me to get a
known amount of plastic and mix it with our soil sample to see what percentage
of the microplastics we could get back. I started with filing down plastic
(I used a PVC Pipe as the plastic and a file to file the pipe) once I filed down enough plastic I weighed 1gram of it and 50 grams of soil and combined them together. I continued to add 200mL of NaCl solution to the sample and continue with the beaker method (figure 1). With the beaker method it states we transfer using a turkey baster but all the microplastics would get stuck on the side of the turkey baster making it unsuccessful (figure 2). I attempted to transfer the micropipette using a sterile transfer pipette but the microplastics clumped on the tip not allowing a proper transfer (figure 3). I tried with a micropipette and a regular green pump pipette and it did not work. Matt suggested that I pour the microplastics and the liquid into the other beaker (figure 4), He thought this would be the best way to transfer even though in was very inefficient. To completely transfer I had to add another 200 mL of solution to get the most microplastics, I added another 200mL and repeated my steps (total volume of 600mL of 5.0M NaCl Solution). Once I was done transferring the microplastics, I had to move on too filtering. I had concerns that our sample would not filter because of how dirty the sample was. Filtering did not go well either since the hose collapsed (figure 5). Everything that we have tried so far has not worked, we are going to keep trying.
Pseudomonas update: We recently did gel electrophoresis and moved on to DNA extraction from the gel (figure 6).
 |
| Figure 3. Clogged Transfer Pipette |
 |
| Figure 4. Transfer through pouring |
 |
| Figure 5. Filtration/ Collapsed hose |
 |
| Figure 6. DNA extraction from gel |
Thursday, October 27, 2016
Blog Post Week 5
 |
| Figure 2. Funnel Separation Apparatus |
 |
| Figure 1. Funnel Separation Apparatus |
My micro plastics project is still in the very
early stages. We continue to have problems with the actual separation of the
microplastics from the soil. We have tried a different technique using a
funnel, tube, and a binder clip to separate the micro plastics from the
sediment. It does not work either because it still gets clogged. I have
attempted to use different size funnels and different tubes without any
success. Matt suggested that we attempt to do the separation in a beaker. For
the beaker method I was supposed to add our 50 grams of soil sample and 200mL
of NaCl solution stir and let it to settle. Once the sediment had settled I was
to use a turkey baster to transfer all the liquid from that beaker into a clean
one (figure 3) and only transferring a small amount of the soil into the other beaker.
This approach did not work well either when I was transferring floating objects
would get stuck to the sides of the beaker (figure 4). The floating parts are what I want.
The idea was to attempt the beaker method and continue using a separation
apparatus. It did not go this way. It did not work. I have to continue trying
to see what method will work. At one point the funnel with the tube setup might
work, I think it will give it another try. I have to find a better clamp. The clamp
I used was very good for holding everything inside the funnel but it is kind of
difficult to but it back on quickly. The soil seemed to be going through slowly
but it sped up very quickly and I could not stop it in time due to the clamp. I
am starting to run out of idea, I am doing more research to find a better
protocol.
 |
| Figure 3. Start of Beaker Method |
 |
| Figure 4. End of Beaker method, Failed |
Pseudomonas Update: This week the plan is to run gels for our positive
controls. We ran PCR on our positive controls last Friday. We will screen the
positive control and choose the best ones to create more positive controls. We
plan to also do DNA extraction from the gels as well.
Friday, October 21, 2016
Blog Post Week 4
 |
| Figure 1. Sodium Chloride Solution in the making |
This week for
the microplastics I started with making a five molarity sodium solutions that
is necessary for the separation process. This took a very long time. I started
with adding the appropriate amount of salt need to have three moles in a liter,
once that was dissolved I would continue adding one mole at a time. It took a
really long time to dissolve the fifth mole of salt. To help dissolve the salt
I used heat. I came in on Monday to actually try to do the separation. This was
fail, I started with weighing out 50grams of soil that had been previously sieved
by Matt. Once I weighed out my sample I added 50 grams into a 500mL separation apparatus
and 50 grams into a 1000mL separation apparatus. I then continued to add 200mL
of the sodium chloride solution to each of the apparatus. Very carefully I took
each apparatus and shook them to mix the soil and the solution. Once the
mixture settled I attempted to let the soil run through the apparatus to only
keep the microplastics which would be floating. This process did not work, the
apparatus got clogged so nothing went through. I got that cleaned and I moved
on to do hydrogen peroxide digestion that Matt had. The sample was supposed to
stop bubbling and we were supposed to dry it. It did not go this way; the
sample would not stop bubbling. We are going to attempt to use a different
percentage of hydrogen peroxide. Another thing I did was go out and collect
three soil sample, these sample had to be dried before I could do anything with
them. When I came back the samples were dried so I continued to pulverize the
samples. Once the samples were pulverized I continued to weigh out 100 grams
and pass the samples through the sieve. I also tried to do the hydrogen
peroxide digestion with these samples, they continued to bubble. This stage of
the project is really trying just to get everything working. For the Legionella project we ran PCR on Pseudomonas
aeruginosa DNA to create more positive controls for ourselves and the
microbiology labs.
 |
| Figure 2. Clogged seperation apparatus |
 |
| Figure 3. Hydrogen Peroxide Digestion |
Wednesday, October 12, 2016
Blog Post Week 3
 |
| Sample gel positive on far right (lane 8) |
 |
| PCR preparation |
 |
| Microplastics Protocol |
 |
| Gel electrophoresis |
Thursday, October 6, 2016
Blog Post Week 2
This week for
the pseudomonas project we will be doing gel electrophoresis on our samples. We
have done water and biofilm collection. We moved on to do filtration, using a filtration
apparatus we trapped any bacteria onto a filter. That filter was then
transferred onto a plate to allow for us to culture the bacteria. The growth
was then transferred into broth to allow to proceed into DNA extraction. For
the DNA extraction we follow a protocol. I found this protocol interesting
because we can see the chromosomal DNA threads being formed. We moved on to Nano
drop to see the DNA concentration. Once we finished Nano dropping we moved on
to PCR. What PCR does is amplifies our DNA using primers that are specific to
the pseudomonas we are looking for. Next week we hope to have our gel
electrophoresis results and maybe move on to DNA sequencing.
Subscribe to:
Posts (Atom)